
The bending process in sheet metal processing can be said to be a process that most sheet metal parts have to go through.
The sheet metal processing and bending process is a process of processing sheet metal into three-dimensional using pressure equipment bending machines and special molds.
Due to the difference in the material, thickness, length and width of the sheet, as well as the shape and angle of the forming, the tonnage and size of the press brake machine are also different, and the height, shape, and V amplitude of the upper and lower dies are also different. The mold shapes are also different.Therefore, before the sheet metal work piece is bent, bending calculation and sheet metal bending design are required. The following is the sheet metal bending design guidelines.
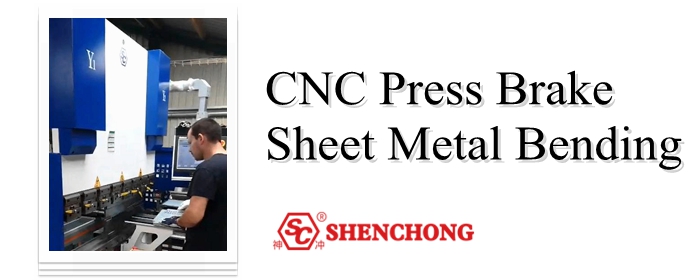
The first thing to consider in sheet metal bending design is how to choose the tonnage and tooling of the press brake.
During the bending process, the force between the upper and lower dies is applied to the material, causing plastic deformation of the material. Working tonnage refers to the bending pressure during bending.
The influencing factors for determining the working tonnage are: bending radius, bending method, die ratio, elbow length, thickness and strength of the bending material, etc., as shown in the figure below.
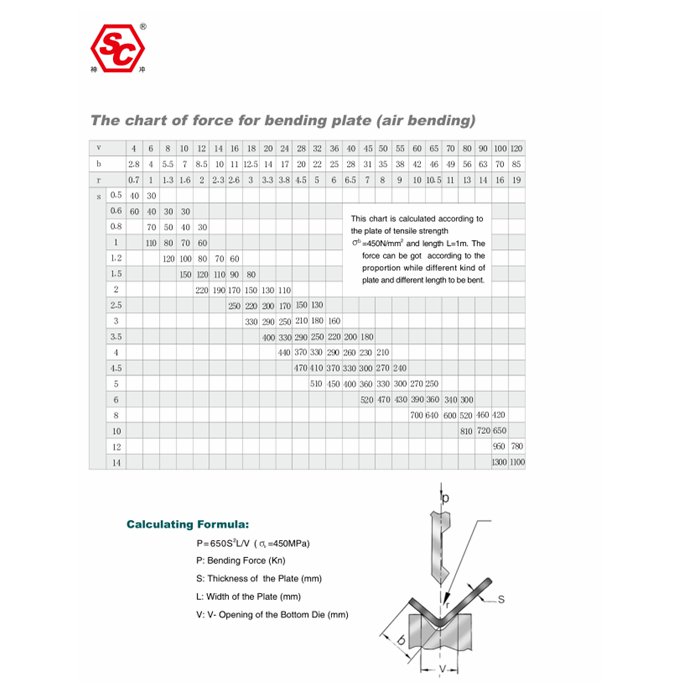
Generally, the working tonnage can be selected from the table below and set in the processing parameters.
Example: S=4mm L=1000mm V=32mm Look up the table and get P=330kN
- Bronze (soft): 0.5
- Stainless steel: 1.5
- Aluminum (soft): 0.5
- Chrome molybdenum steel: 2.0
The unit of each parameter P——kN, S——mm, L——mm, V——mm
In order to prolong the life of the mold, when the part is designed for bending, the rounded corners should be used as much as possible.
If the flange height is too small, even if a bending die is used, it is not conducive to forming. Generally, the length of the flange height should be at least three times greater than the wall thickness of the plate.
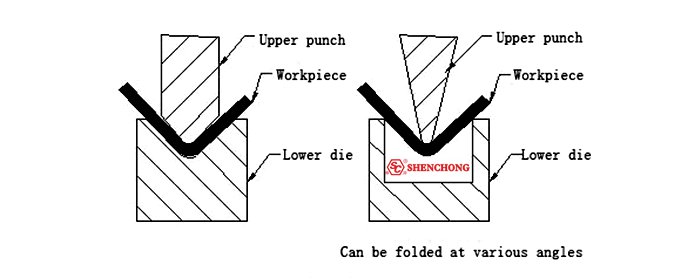
For sheet metal bending with high precision requirements and irregular bending shapes, CNC bending machines are generally used for bending. The basic principle is to use the bending knife (upper die) and V-shaped groove (lower die) of the bending machine. Bend and form sheet metal parts. SHENCHONG CNC bending machine has a high degree of automation, high bending accuracy, convenient clamping, accurate positioning and fast processing speed.
The basic principle of forming is shown in the figure below:
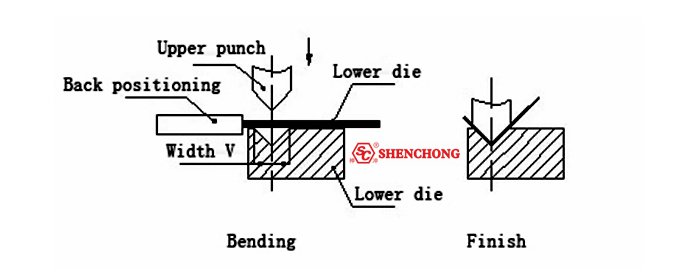
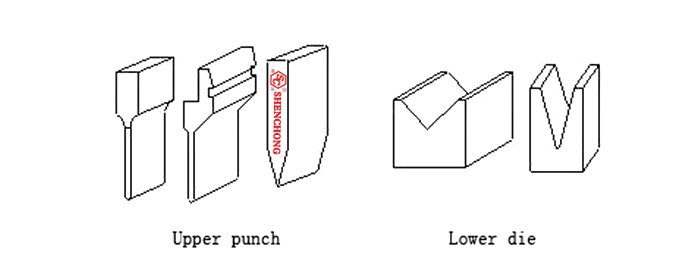
The form of the upper punch is shown in the figure below. The processing is mainly based on the shape of the work piece. Generally, the shape of the upper punch of the processing manufacturer is more, especially the manufacturer with a high degree of specialization. In order to process various complex bending, Customized upper punch of many shapes and specifications.
There are many factors that affect the bending process, mainly including the arc radius of the upper punch, the material, the thickness of the material, the strength of the lower die, and the die size of the lower die. In order to meet the needs of the product, and under the condition of ensuring the safety of the bending machine, the manufacturer has serialized the bending die. We need to have a general understanding of the existing bending die during the structural design process.
See the picture below for the upper die on the left and the lower die on the right.
The current bending form is generally as shown in the following figure:
When bending sheet metal, a bending radius is required at the bending point. The bending radius should not be too large or too small, and should be selected appropriately. If the bending radius is too small, it is easy to cause cracking at the bend, and if the bending radius is too large, the bending is easy to rebound.
The rounded corner of the bending knife of the manufacturer is usually 0.3, and the rounded corner of a small amount of bending knife is 0.5. Preferred bend radii for different thicknesses of various materials.
For ordinary low carbon steel plate, rust-proof aluminum plate, brass plate, red copper plate, etc., there is no problem with the fillet of 0.2, but for some high carbon steel, hard aluminum, super hard aluminum, this bending fillet It will cause the bend to break, or the outer fillet to crack.
The initial state of the L-shaped work piece at the time of bending is shown in the figure below
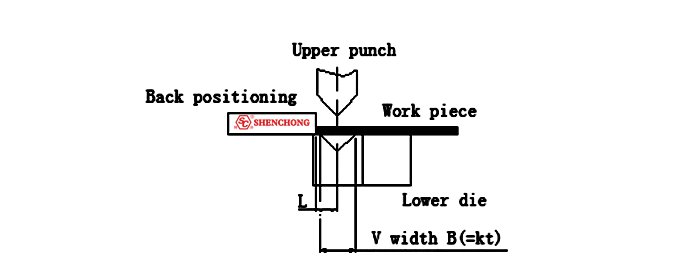
The minimum bending size corresponding to the L-shaped bending of sheet metal with different material thicknesses:
No. | Material thickness | V Width | R | L-shaped bending height |
1 | 0.5 | 4 | 0.2 | 3 |
2 | 0.6 | 4 | 0.2 | 3.2 |
3 | 0.8 | 5 | 0.8 or 0.2 | 3.7 |
4 | 1.0 | 6 | 1 or 0.2 | 4.4 |
5 | 1.2 | 8 (or 6) | 1 or 0.2 | 5.5 (or 4.5) |
6 | 1.5 | 10 (or 8) | 1 or 0.2 | 6.8 (or 5.8) |
7 | 2.0 | 12 | 1.5 or 0.5 | 8.3 |
8 | 2.5 | 16(or14) | 1.5 or 0.5 | 10.7(or 9.7) |
9 | 3.0 | 18 | 2 or 0.5 | 12.1 |
10 | 3.5 | 20 | 2 | 13.5 |
The initial state of the Z-shaped work piece at the time of bending is shown in the figure below
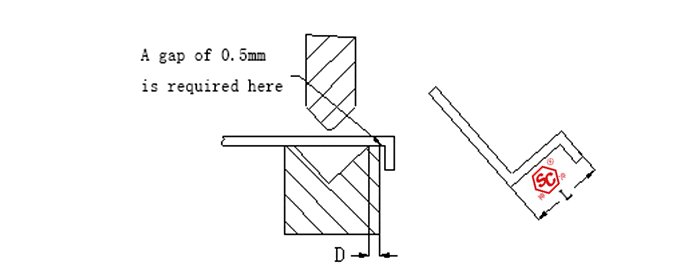
The minimum bending size corresponding to the Z-shaped bending of sheet metal with different material thicknesses:
No. | Material thickness | V Width | R | Z-Shaped bending height |
1 | 0.5 | 4 | 0.2 | 8.5 |
2 | 0.6 | 4 | 0.2 | 8.8 |
3 | 0.8 | 5 | 0.8 or 0.2 | 9.5 |
4 | 1.0 | 6 | 1 or 0.2 | 10.4 |
5 | 1.2 | 8 (or 6) | 1 or 0.2 | 11.7 (or 10.7) |
6 | 1.5 | 10 (or 8) | 1 or 0.2 | 13.3 (or 12.3) |
7 | 2.0 | 12 | 1.5 or 0.5 | 14.3 |
8 | 2.5 | 16 (or 14) | 1.5 or 0.5 | 18.2 (or 17.2) |
9 | 3.0 | 18 | 2 or 0.5 | 20.1 |
10 | 3.5 | 20 | 2 | 22 |
After calculating the working tonnage and selecting the bending die, the bending sequence is what we need to consider in the sheet metal bending design.
- Bend the short side first and then the long side: Generally speaking, when four sides are bent, bending the short side first and then the long side is conducive to the processing of the work piece and the assembly of the bending punch and die.
- Fold the periphery first and then the middle: under normal circumstances, it is generally bent from the periphery of the work piece to the center of the work piece.
- Partial first and then whole: If there are some structures inside or outside the work piece that are different from other bending structures, generally these structures are bent first and then other parts are bent
- Consider the interference situation and arrange the bending sequence reasonably: the bending sequence is not static, and the processing sequence should be adjusted appropriately according to the shape of the bending or obstacles on the work piece.
Click here to know more about Metal Sheet Bending Process
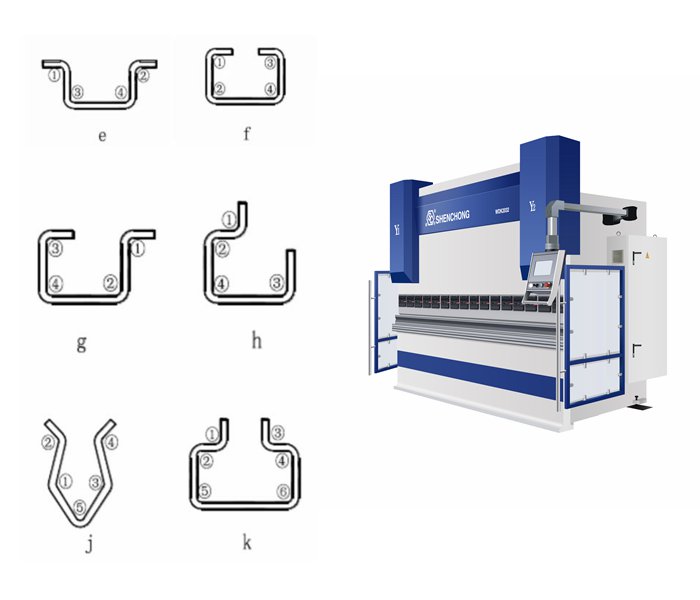
- It is necessary to consider whether the tool of the press brake meets the requirements of the R in drawing paper.
- It depends on whether the lower die or clamps of the bending machine blocks the position of the next bending.
- After this bending, whether it has just rubbed or collided with the bending tool and clamps.
- Check whether the last one to be bent rubs or collides with the bending tool and clamps.
- See if the size of the last bend can be used as the positioning benchmark for the next bend.